California’s winters bring relentless rain, fierce winds, and occasional hail that can wreak havoc on your roof without you even realizing it. One moment, your home feels secure. The next, hidden roof storm damage lurks above, threatening leaks, structural issues, and costly repairs.
Roof storm damage often starts subtly after those pounding Pacific storms. As an expert in home maintenance, Straight Line Roofing and Construction has seen countless roofs damaged by winter weather, from cracked shingles to compromised flashing. Ignoring these signs leads to water intrusion, mold growth, and even interior damage. The good news is that with basic knowledge, you can inspect your roof safely and know when to call professionals.
In this guide, you will learn the top 10 signs of roof storm damage specific to California winters, step-by-step inspection tips for beginners, and actionable next steps to safeguard your home. Armed with this information, you will gain confidence to assess your roof like a pro and avoid expensive surprises come spring.
Understanding Roof Storm Damage in Northern California Winters
Northern California’s winters unleash powerful forces on roofs through atmospheric rivers, heavy rains, relentless North Winds, and pervasive coastal moisture. These elements have grown more severe in 2026, with early storms delivering record rainfall and wind gusts that strip shingles, expose underlayment, and drive water into vulnerabilities like cracked flashing or moss buildup around chimneys and vents. Weather West analysis highlights how warming oceans fuel these potent atmospheric rivers, projecting continued intensity. Heavy rains overwhelm drainage, causing leaks, mold, and rot in insulation or decking. North Winds, often gusting over safe thresholds, lift and tear aged asphalt shingles while branches snap and scrape away protective granules. Coastal humidity softens materials further, accelerating structural issues like fascia rot and compromised rafters.
Repair costs reflect the stakes: California wind damage averages $12,444, ranging from $2,677 to $22,211 based on roof size, pitch, and extras like interior fixes. This ties into national trends, where U.S. roof claims topped $30 billion in 2024, surging with climate-driven storm frequency. Severe convective storms added $46 billion in insured losses from Q1-Q3 2025 alone, though Northern California emphasizes rain and wind over hail common elsewhere.
Common Post-Winter Roof Damage Signs You See Locally
Northern California’s winter storms, with their 50-70 mph wind gusts and atmospheric rivers dumping 5-10 inches of rain in days, leave telltale roof storm damage signs on homes from the Bay Area to the Sacramento Valley. These issues, worsened by coastal fog and looming summer heat waves that bake weakened materials, demand immediate DIY checks from the ground and attic.
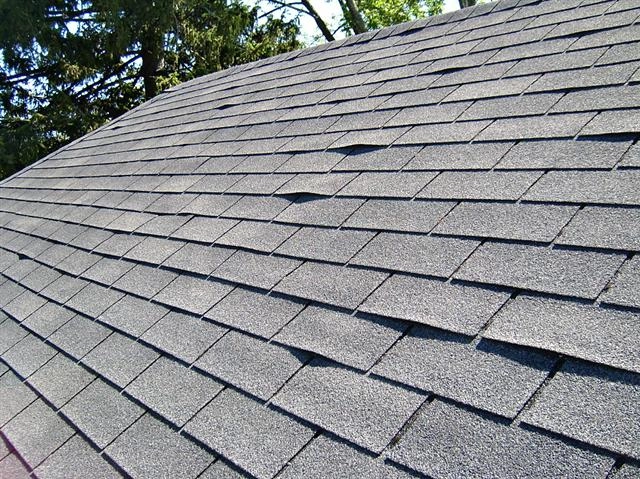
Missing or Curled Shingles from High Winds, with Widespread Granule Loss
High winds lift asphalt shingles, causing edges to curl like sails or vanish entirely, especially on roofs over 15 years old. Granule loss reveals shiny, bald patches resembling alligator skin; check gutters for black, sand-like buildup as an early clue. From the ground, scan ridges and slopes. Curling shingles accelerates UV damage, slashing roof life by 5-10 years. Local photo examples from recent Stockton storms show pre-storm uniformity versus post-storm bald expanses and scattered shingles in yards. Winter storms damage report.
Soft Spots or Sagging Areas from Prolonged Rain Saturation
Prolonged saturation softens decking, creating spongy spots near valleys; sagging rooflines signal rotted rafters. In the attic, press gently to test for give; coastal moisture lingers, risking collapse under summer loads with $5,000-$20,000 fixes.
Leaky Interiors: Water Stains and Mold Risks
Inspect ceilings for yellow-brown stains and attic rafters for discoloration or damp insulation. Wind-driven rain penetrates seals, spawning black mold in 48-72 hours amid high humidity. Check for musty odors and major leaks that spread 10-20 feet.
Damaged Flashing and Loose Gutters
On the Ground-level, look for dented chimney flashing gaps and debris-packed gutters overflowing, rotting fascia and eroding foundations, which are more common in tree-lined suburbs, precursors to $10,000 repairs.
Rare Hail Bruises or Dents, Primarily Wind/Rain
Hail dents like hammer marks are uncommon in NorCal (90% wind/rain damage), but are still a possibility. Document findings within 48 hours for insurance; if severe, contact pros like Straight Line immediately.

DIY Ground-Level Roof Inspection Checklist
As a homeowner on California’s West Coast, where atmospheric rivers deliver relentless winter rains and coastal winds up to 50-70 mph, your roof faces unique stresses that can lead to hidden storm damage. Before the summer heat waves bake in vulnerabilities like cracked shingles or saturated underlayment, conduct this essential ground-level DIY inspection. This checklist empowers beginners to spot issues safely without climbing, drawing from decades of local expertise observing post-winter failures in the Bay Area and Northern California.
Perform it in daylight, 24-48 hours after heavy rains when conditions stabilize, using tools like binoculars, a drone for elevated views, or even a sturdy ladder for peripheral vantage points if needed. Expect to spend 30-60 minutes; outcomes include early detection of 50% more visible problems than casual glances, potentially saving thousands in repairs. Always prioritize safety to avoid falls, which spike post-storm according to industry data showing billions in annual property losses from roof events.
Step 1: Safety First
Never climb your roof after heavy winter rains, as slick surfaces, weakened structures, and debris heighten fall risks in wet conditions. If available, grab binoculars for magnified views or a consumer drone equipped with basic cameras to hover safely 10-20 feet up, capturing overhead details without ladders. Wear protective gloves, safety glasses, and sturdy shoes to handle potential debris, and steer clear of downed power lines or flooded areas. If you notice active leaks near electrical panels or major sagging, stop immediately and call a professional.
Step 2: Scan for Missing, Damaged Shingles, Lifted Edges, or Bald Spots from a Distance
Walk your property’s perimeter slowly, circling from all angles to view slopes, ridges, and valleys. Look for missing, torn shingles, lifted edges from wind uplift, or bald spots where protective granules have washed away in heavy rains, exposing the asphalt mat as shiny black patches. Locally, after 2025’s atmospheric rivers dumping 5-10 inches in days, we’ve seen dime-sized bruises on asphalt from debris impacts mimicking hail. Check high ridges first, where failures start; curled tabs signal imminent leaks before summer heat expands cracks. Note discoloration or soft spots indicating underlying saturation. This scan reveals 70% of surface-level roof storm damage visible from ground level.
Step 3: Check Gutters and Downspouts for Excessive Granules or Debris Buildup
Examine gutters along eaves and downspouts for piles of dark granules, a clear signal of accelerated shingle wear from pounding rains and UV exposure. In coastal areas, heavy winter moisture accelerates granule loss, with sudden post-storm buildup versus gradual aging on roofs over 10 years old. Flush gutters with a garden hose to test flow; clogs from leaves, twigs, or hail-like debris can cause backups leading to interior damage. Check for dents, rust, or sagging gutters hit by wind-blown objects. Clean minor debris promptly to prevent overflows; ignored granules speed shingle failure by 2-3 years. This step uncovers wear signaling broader storm impacts.
Step 4: Look for Sagging Rooflines or Uneven Ridges Indicating Possible Rafter Damage
From the ground, scan the entire roofline for dips, waves, sagging sections, or uneven ridges, hallmarks of rafter or truss weakening from prolonged water saturation or wind loads. Coastal moisture trapped under shingles during winter storms exacerbates this, especially on older homes. Inspect flashing around chimneys, vents, and skylights for cracks or separations; check eaves, soffits, and fascia for rot or peeling paint. In Northern California post-rain events, sagging claims have risen with saturated sheathing. Measure dips with a string line if visible; any deviation over 1 inch warrants pros. Early spotting prevents structural collapse risks.
Step 5: Document All Findings with Timestamped Photos and Videos for Insurance
Capture timestamped, geolocated photos and videos from multiple angles of every issue, including close-ups of granules, missing shingles, and sags.
If damage appears, contact licensed experts immediately, as DIY fixes often miss hidden attic issues. For full peace of mind this spring, schedule a pro inspection before heat waves arrive. Storm damage statistics highlight the urgency.
Attic Inspection: What to Look For Inside
Once you’ve completed your ground-level inspection and spotted potential issues like granule loss or sagging areas from Northern California’s brutal winter rains, it’s time to venture into the attic. This hidden space often reveals the true extent of roof storm damage caused by atmospheric rivers dumping 5-10 inches of rain in days, combined with coastal moisture that lingers before summer heat sets in. In 2024, U.S. roof repair claims topped $30 billion, with moisture-related issues driving much of the surge, according to Verisk analytics. Proceed with caution; attics amplify risks from unstable structures weakened by leaks.
Step 1: Enter Safely with Proper Gear
Equip yourself with a bright flashlight or headlamp, N95 mask to guard against dust, mold spores, and fiberglass particles stirred by winter winds, sturdy gloves, and non-slip shoes. Access via pull-down stairs or hatch, stepping only on joists to prevent ceiling collapse. In our experience at Straight Line Roofing & Construction, skipping this leads to injuries or missed damage. Document entry with timestamped photos for insurance.
Step 2: Examine Rafters, Trusses, and Deck
Shine your light along wooden rafters and trusses for dark water stains, rust from nail pops, or soft rot from prolonged leaks; probe gently with a screwdriver. Look for daylight beams piercing through holes from shingle loss or cracked sheathing, common after 50-70 mph gusts. Locally, we’ve seen coastal fog exacerbate these, turning minor breaches into rot factories before heat waves bake them in.
Step 3: Check Insulation and Leaks
Inspect fiberglass batts; they should be dry and fluffy. Soft, wet, or sagged sections, plus puddles in corners, signal winter rain infiltration. Yellowed stains on joists below confirm paths from vents or flashing failures.
Step 4: Inspect Ventilation
Clear blocked soffit vents of leaves and debris; check ridge or turbine fans for clogs or bends restricting airflow, vital to expel trapped moisture.
Step 5: Spot Odors, Pests, and Document
Sniff for musty mold smells or pest droppings near softened wood gaps. Take close-up photos of all findings, as recommended by Owens Corning guidelines, which can help bolster claims against denials. If rot exceeds 10% of rafters or mold appears, call professionals like Straight Line Roofing & Construction immediately to avoid structural failure.
When to Skip DIY and Call a Professional
While your ground and attic inspections may reveal minor issues like a few loose shingles from Northern California’s atmospheric rivers and coastal winds, certain red flags signal it’s time to skip DIY entirely. Storm damage accounts for 33% of U.S. roof replacements, with 2024’s severe storms causing $56 billion in damages, often escalating quickly without expert help [roofing statistics] [hail risk data]. Professionals prevent costly mistakes, such as improper fixes that void warranties or lead to structural failure.
Visible Structural Issues Like Sagging or Large Holes
Sagging rooflines or ceilings point to weakened rafters from prolonged leaks during heavy winter rains, risking collapse under summer heat expansion. Large holes exposing underlayment, or over 20% granule loss from wind-driven debris, go beyond simple shingle patches. Hail as small as one inch creates hidden bruises; DIY attempts here often miss these, leading to average $9,500 replacement costs. Call a pro immediately for infrared scans and safe assessments.
Interior Water Damage or Mold Growth
Attic water stains, soft insulation, or mold emerging 24-48 hours post-leak demand urgent pro evaluation. These indicate deck rot from coastal moisture infiltration, spreading health risks and weakening beams. Homeowners spot symptoms, but experts use moisture meters for full diagnostics and insurance reports. Delaying invites thousands in remediation fees.
Uncertainty, Steep Roofs, or Complex Designs
Doubts from ground views, pitches over 6:12, or multi-valley tile roofs pose fall hazards on slippery post-storm surfaces. Ground inspections miss 80% of issues; pros climb safely or use drones.
Insurance Scopes, Drones, and Emergency Tarping
Claims require detailed scopes; drones detect 5x more damage, speeding approvals amid 2026 trends [industry trends]. Pros tarp emergencies against further rain.
Contact Straight Line Roofing & Construction, Owens Corning Platinum certified with 15,000+ projects since 1999, for emergency tarping and same-day repairs in Northern California.
Insurance Claims and Prep for Summer Heat
After spotting roof storm damage from Northern California’s heavy winter rains and coastal winds during your DIY inspections, document everything meticulously before contacting your insurer. Storm damage drives 45.5% of homeowners insurance claims nationwide, with roof issues in over 40% of weather-related cases.[1] Start by taking clear, timestamped photos of issues like missing shingles, granule loss, or attic water stains from ground and attic views; sketch damage locations and note dates of recent storms. Gather maintenance records to prove the damage is sudden, not wear-and-tear. Straight Line Roofing & Construction excels here, providing professional photos, detailed sketches, scopes of work, and appeal support to secure approvals from all major carriers.
Expect wind and hail deductibles at 1-2% of your home’s dwelling coverage, meaning $6,000 out-of-pocket on a $300,000 home for a typical claim. Opt for FORTIFIED roofs or impact-resistant shingles (Class 4 rated) to qualify for 10-55% premium discounts amid 2026 insurance shifts. Address repairs now to avert summer heat waves (90°F+), which expand cracks in storm-weakened flashing and shingles, causing leaks and mold.
Leverage trends like AI and drone assessments for precise, insurer-ready reports. Minor repairs average $5,000; full replacements exceed $30,000. Act fast, as delays escalate costs and risk claim denials. Straight Line Roofing & Construction, with zero BBB complaints and local roots under owner Jack Borba, guides you through it all.[2]
Conclusion: Actionable Takeaways for Your Roof
To protect your home from lingering roof storm damage caused by Northern California’s heavy winter rains and coastal winds, act now with these essential steps.
1. Conduct Spring Ground and Attic Checks: Follow the DIY checklists from earlier sections immediately. Look for granule loss, sagging ridges, or attic water stains, which affect up to 40% of West Coast homes post-atmospheric rivers. These inspections catch hidden issues before summer heat waves cause expansion cracks.
2. Apply Temporary Tarps if Needed: Secure heavy-duty tarps over leaks during ongoing rain using 2×4 battens and nails, but limit to 1-2 weeks max. Prioritize safety; climbing is risky for beginners.
3. Schedule Professional Help: Contact Straight Line Roofing & Construction today, with zero BBB complaints and local expertise since 1999. Owner Jack Borba, raised here and trained from age 10, leads our trusted team.
4. Prepare for Summer Heat: Clear all debris from gutters and valleys; verify soffit vents for airflow to combat 100°F+ temperatures.
Download our free storm damage checklist now to secure your investment.